Delicious dishes made from canned fish are becoming increasingly popular thanks to their convenience, affordability, and nutritional value. Cooking with canned fish allows home cooks to prepare quick, flavorful meals without compromising on protein or essential nutrients. In this guide from cannedfish.shop, we introduce five easy and practical canned fish recipes that demonstrate how versatile canned fish can be. From simple pasta dishes to balanced rice bowls and light salads, the following sections walk you through each recipe step by step, helping you turn canned fish into satisfying meals for everyday cooking, busy schedules, and health-conscious lifestyles.
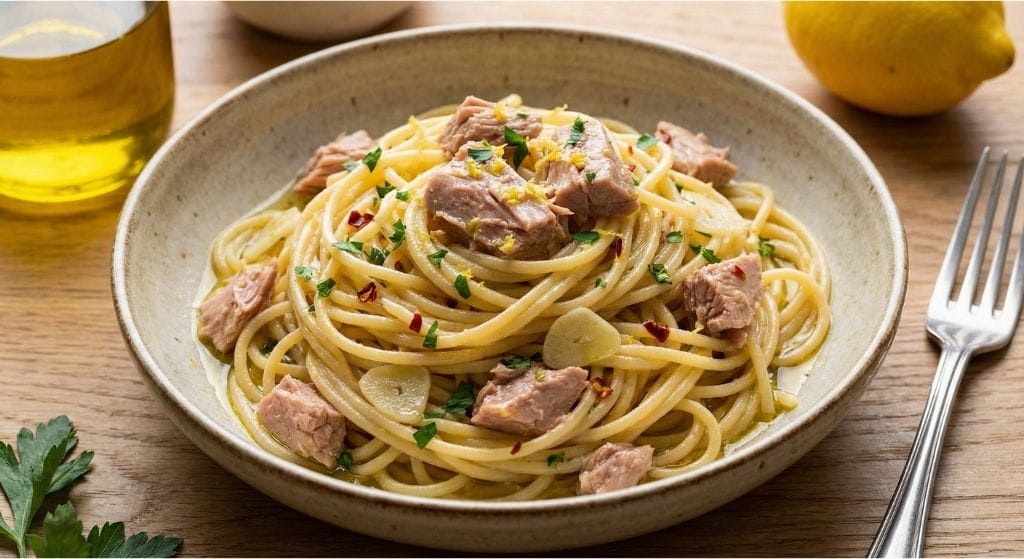
1. Canned Tuna Pasta – Building Flavor Without Dryness
Canned tuna pasta is one of the most popular dishes made from canned fish thanks to its simplicity and accessibility. However, many home cooks struggle with dry texture and an unpleasant fishy aroma. The key to a successful canned tuna pasta lies in proper heat control and timing. Tuna from a can is already fully cooked, so the goal is to gently warm and coat it in sauce rather than cook it again.
When prepared correctly, this dish delivers a balanced combination of savory richness, clean seafood flavor, and satisfying texture.
Ingredients You Will Need:
-
Pasta (spaghetti or penne work best)
-
1 can of solid or chunk tuna (preferably packed in olive oil)
-
Olive oil
-
Garlic, finely sliced or minced
-
Salt
-
Black pepper
-
Optional: chili flakes, fresh parsley, lemon zest
Best tuna choice:
Solid or chunk tuna retains its structure during cooking and provides a more satisfying bite. Tuna packed in olive oil offers better mouthfeel and flavor compared to water-packed varieties. Skipjack or yellowfin tuna are ideal for a balanced taste that is not overly strong.
Step-by-Step Cooking Process:
1. Cook the Pasta Correctly
Bring a large pot of water to a rolling boil and season generously with salt. The water should taste slightly salty, similar to seawater. Cook the pasta until it is about one minute shy of al dente, as it will finish cooking in the sauce later.
Reserve a small cup of pasta water before draining.
2. Build the Aromatic Base
In a wide pan, gently warm olive oil over low to medium heat. Add garlic and allow it to soften slowly. Avoid browning the garlic, as this can introduce bitterness and overpower the delicate flavor of the tuna.
3. Combine Pasta and Sauce
Add the drained pasta directly to the pan. Toss gently to coat the pasta in the aromatic oil, allowing it to absorb flavor evenly.
4. Add Tuna at the Right Moment
Remove the pan from direct high heat and add the tuna last. Break it into large chunks using a spoon or your hands. Avoid stirring aggressively—gentle folding helps preserve the tuna’s texture and prevents it from drying out.
5. Emulsify for a Light, Silky Sauce
Add a small splash of reserved pasta water and toss gently. The starch in the water helps bind the oil and pasta, creating a light, cohesive sauce without heaviness.
Pro Tips for Better Results:
-
Do not overheat the tuna: High heat dries out the fish and intensifies odors. Gentle warming is enough.
-
Use lemon zest, not juice: Lemon zest brightens the dish without adding excess acidity that can overpower the tuna.
-
Season gradually: Tuna and pasta water both contain salt, so adjust seasoning at the end.
-
Finish with herbs: Fresh parsley or basil adds freshness and balances the richness of olive oil.
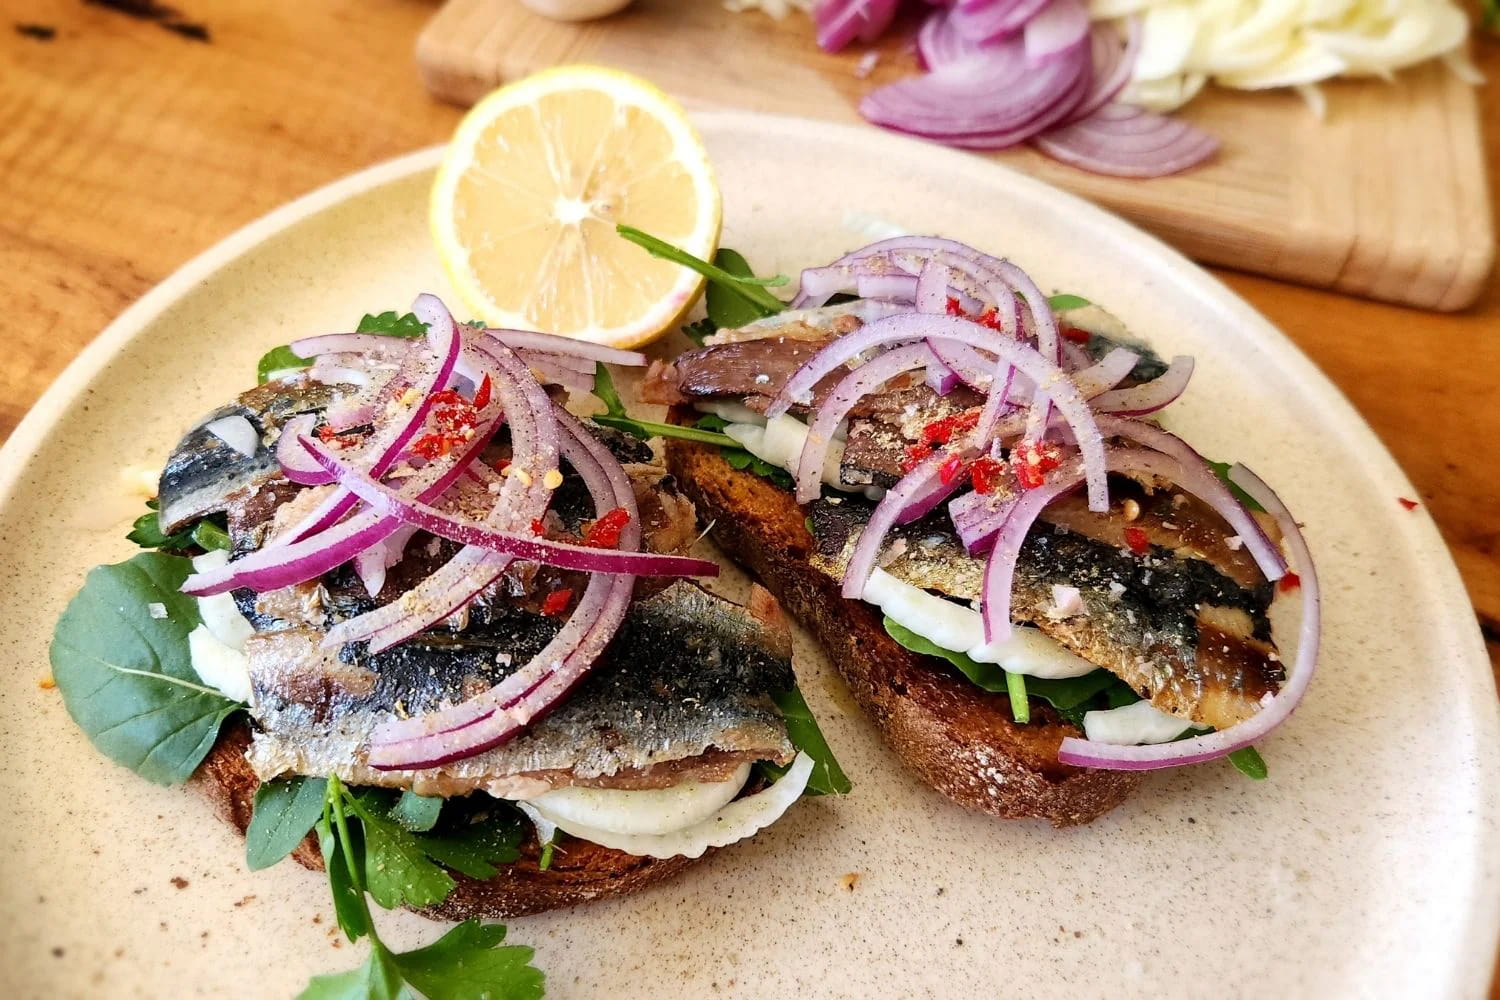
2. Sardine Toast – Balancing Richness and Freshness
Sardine toast is a simple yet highly flavorful dish that showcases the natural richness of canned sardines. Because sardines are oily and have a strong, distinctive taste, the success of this dish depends on balance—specifically the contrast between crispy bread, rich fish, and fresh, acidic elements. When prepared correctly, sardine toast becomes a satisfying meal or appetizer that feels both rustic and refined.
Ingredients You Will Need:
-
Canned sardines (preferably packed in olive oil)
-
Bread (sourdough or whole-grain bread works best)
-
Fresh tomatoes or cherry tomatoes
-
Olive oil
-
Black pepper
-
Fresh herbs (parsley, basil, or dill)
-
Optional: chili flakes, lemon zest
Best sardine choice:
Choose whole sardine fillets with skin intact, packed in high-quality olive oil. Avoid sardines that are overly salty or mashed, as they tend to lose texture and flavor clarity.
Step-by-Step Cooking Process:
1. Toast the Bread Properly
Toast the bread until it is deeply golden and crisp. A strong, well-toasted base is essential to support the oil-rich sardines and prevent the toast from becoming soggy.
2. Prepare the Sardines Gently
Remove the sardines from the can and allow excess oil to drain slightly, but do not discard all of it. Warm the sardines gently in a pan over low heat using a small amount of their own oil. Do not fry or brown them—this dish relies on soft texture, not crispiness.
3. Add Fresh Elements
Slice fresh tomatoes and lightly season them with a pinch of salt. The natural acidity of tomatoes helps cut through the richness of the sardines and refresh the palate.
4. Assemble the Toast
Place warm sardines on top of the toasted bread. Add the seasoned tomatoes, then finish with a light drizzle of olive oil.
5. Finish with Herbs and Seasoning
Sprinkle freshly cracked black pepper and chopped herbs over the toast. Herbs add freshness and aromatic complexity without overpowering the fish.
Pro Tips for Better Results:
-
Avoid heavy seasoning: Sardines are naturally flavorful; minimal seasoning works best.
-
Use acidity wisely: Lemon zest or tomatoes provide brightness without making the dish sour.
-
Do not overheat the fish: Overcooking intensifies strong flavors and can make sardines unpleasant.
-
Serve immediately: Sardine toast is best enjoyed warm, before the bread softens.
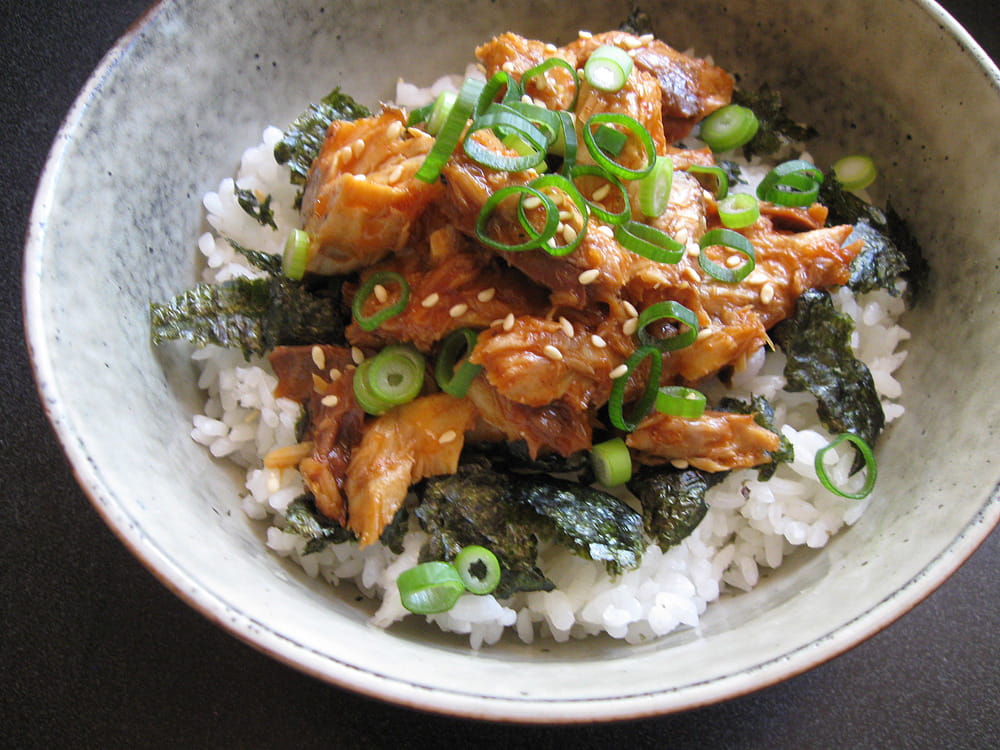
3. Canned Mackerel Rice Bowl – Controlling Richness and Texture
Canned mackerel rice bowls are popular because they are filling, nutritious, and easy to assemble. However, mackerel is naturally rich in oil and has a stronger flavor than tuna or sardines. To make this dish enjoyable and well-balanced, the key lies in managing richness, preserving texture, and layering flavors rather than mixing them aggressively.
When done correctly, this dish delivers a comforting yet clean taste that highlights the natural qualities of high-quality canned mackerel.
Ingredients You Will Need:
-
Steamed white or brown rice
-
1 can of mackerel (in brine, light soy sauce, or oil)
-
Steamed or blanched vegetables (broccoli, carrots, spinach, or green beans)
-
Soy sauce or light seasoning sauce
-
Sesame oil
-
Optional: fried egg, sesame seeds, green onions
Best mackerel choice:
Choose canned mackerel with firm, intact fillets rather than shredded pieces. Mackerel packed in brine or light sauce offers better control over salt and oil levels.
Step-by-Step Cooking Process
1. Prepare the Rice
Cook the rice until fluffy and fully cooked, not sticky or overly wet. Neutral-flavored rice is essential because it absorbs the savory oils from the mackerel and balances the dish.
2. Drain and Handle the Mackerel Carefully
Remove the mackerel from the can and gently drain excess oil or liquid. Leave a small amount for flavor, but avoid adding too much, as this can make the dish greasy. Flake the fish gently by hand to preserve its natural structure.
3. Prepare the Vegetables
Lightly steam or blanch vegetables until just tender. Overcooked vegetables will lose texture and dilute the overall flavor balance.
4. Assemble the Bowl in Layers
Start with warm rice at the base. Add vegetables on top, followed by the mackerel. Layering keeps each component distinct and prevents the dish from becoming heavy or mushy.
5. Season Lightly
Add a small splash of soy sauce and just a few drops of sesame oil. Both ingredients are powerful, so restraint is important. Optional toppings such as sesame seeds or green onions add aroma and crunch.
Pro Tips for Better Results:
-
Do not over-season: Mackerel already has a strong flavor profile.
-
Use oil sparingly: Too much oil masks the fish’s natural taste.
-
Flake by hand, not with a fork: This helps maintain a clean texture.
-
Add a fried egg carefully: A soft yolk can add richness, but balance is key.
4. Canned Salmon Patties – Achieving a Crispy Exterior and Moist Interior
Canned salmon patties are a classic way to transform canned fish into a hearty, satisfying meal. Despite their simplicity, many salmon patties turn out dry, dense, or oily. The key to success is proper moisture control, minimal binding, and correct pan temperature. When done right, canned salmon patties develop a crisp outer crust while remaining tender and moist inside.
Ingredients You Will Need
-
1 can of salmon, drained
-
1 egg
-
Breadcrumbs or panko
-
Onion or shallot, finely chopped
-
Salt and black pepper
-
Cooking oil (neutral oil such as vegetable or canola)
-
Optional: mustard, dill, parsley, lemon zest
Best salmon choice:
Use wild-caught canned salmon packed in water. Salmon with soft, edible bones adds calcium and improves texture when mashed gently. Avoid overly oily or heavily seasoned varieties.
Step-by-Step Cooking Process
1. Drain the Salmon Thoroughly
Excess moisture prevents patties from holding shape and browning properly. After draining, gently press the salmon with paper towels to remove remaining liquid.
2. Prepare the Mixture
In a bowl, combine salmon, egg, onion, salt, and pepper. Add breadcrumbs gradually—just enough to bind the mixture. Overusing breadcrumbs will make the patties dry and dense.
3. Shape and Rest the Patties
Form the mixture into evenly sized patties. Place them on a plate and refrigerate for 10–15 minutes. This resting step helps the patties firm up and prevents them from breaking apart during cooking.
4. Pan-Fry at the Right Temperature
Heat a thin layer of oil in a pan over medium heat. Once the oil is hot but not smoking, add the patties. Cook for 3–4 minutes per side until golden brown. Avoid flipping too often, as this can disrupt crust formation.
5. Drain and Serve
Transfer patties to a paper towel to remove excess oil. Serve immediately while the exterior remains crisp.
Pro Tips for Better Results
-
Use minimal binding: The salmon should remain the star.
-
Avoid high heat: Too much heat browns the outside before the inside warms.
-
Add herbs thoughtfully: Fresh dill or parsley enhances flavor without overpowering the fish.
-
Finish with acidity: A squeeze of lemon or a yogurt-based sauce balances richness.

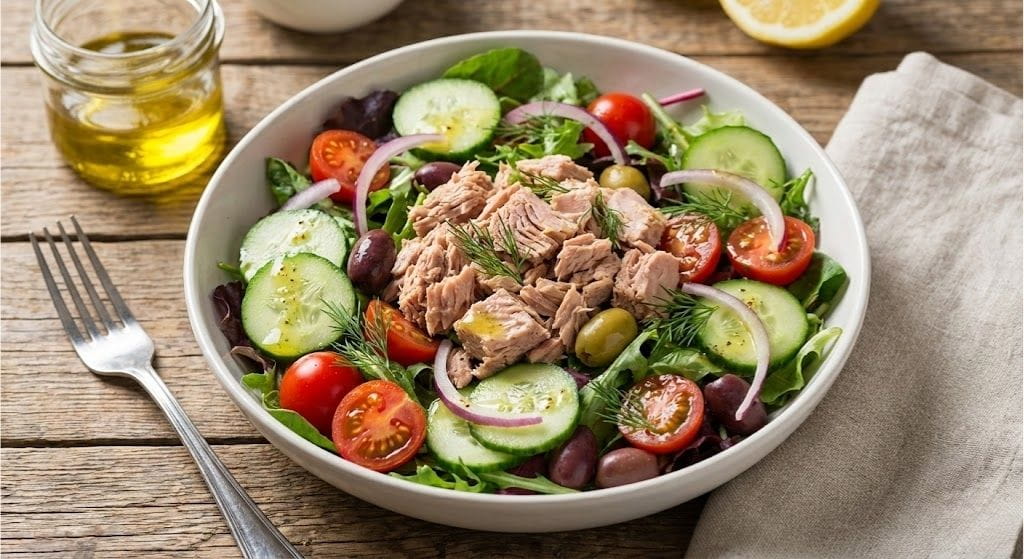
5. Fresh Canned Fish Salad – Keeping Flavors Clean and Balanced
A fresh canned fish salad is the lightest and most ingredient-driven dish in this series. Because there is little to no cooking involved, the quality of the canned fish and the balance of seasoning play a critical role. The goal is to highlight the natural flavor of the fish while keeping the overall taste clean, refreshing, and well-balanced.
This dish is ideal for health-conscious eaters or anyone looking for a quick yet nutritious meal.
Ingredients You Will Need:
-
Mixed salad greens (lettuce, arugula, or spinach)
-
Canned fish (tuna, sardines, or salmon)
-
Cherry tomatoes
-
Cucumber or other fresh vegetables
-
Olive oil
-
Fresh lemon juice or lemon zest
-
Salt and black pepper
Best fish choice:
Choose high-quality canned fish packed in water or olive oil with minimal additives. Tuna works well for a neutral profile, while sardines and salmon add richer flavor and healthy fats.
Step-by-Step Preparation Process:
1. Prepare the Vegetables Properly
Wash and dry all vegetables thoroughly. Excess water can dilute dressing and make the salad taste bland. Crisp, dry greens provide better texture and flavor.
2. Season the Greens First
Lightly season the salad greens with a pinch of salt and a small drizzle of olive oil before adding the fish. This ensures even seasoning throughout the dish.
3. Add the Fish Gently
Place the canned fish on top of the greens and gently break it into large chunks. Avoid over-mixing to preserve the fish’s natural texture.
4. Dress Lightly
Add a small amount of olive oil and lemon juice or lemon zest. The dressing should enhance the fish, not overpower it.
5. Finish with Fresh Seasoning
Season with freshly cracked black pepper and adjust salt only if needed. Serve immediately for best texture and freshness.
Pro Tips for Better Results:
-
Less is more: Avoid heavy dressings or strong sauces.
-
Add acidity carefully: Lemon zest provides brightness without making the salad sour.
-
Keep textures distinct: Do not toss aggressively.
-
Serve fresh: Canned fish salad is best enjoyed immediately after assembly.
These five dishes demonstrate how canned fish can be transformed into flavorful, nutritious meals when handled with proper technique. By understanding heat control, seasoning balance, and texture management, home cooks can elevate canned fish far beyond its basic reputation. With high-quality canned fish and thoughtful preparation, canned seafood becomes a versatile and reliable ingredient for everyday cooking.